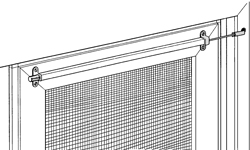
Other Products Installation
|
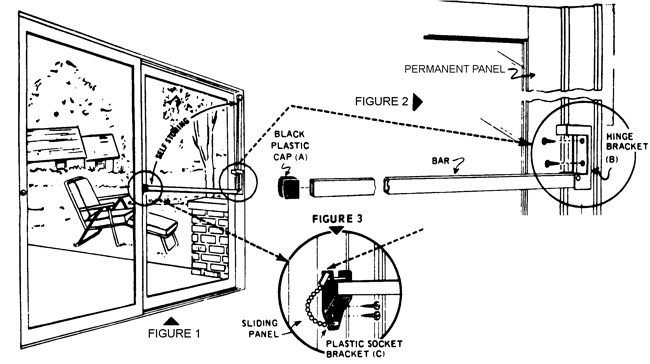
CHARLEY-BAR
SAFETY LOCK Installation
Important: "Charley Bar" is meant to be
used in addition to patio door lock. For doors with sliding
panel on the inside and stationary panel on the outside IMPORTANT!:
Read all instructions before beginning installation!
- Slide door to closed position and lock
- Remove Black Plastic Cap (A) from end of Bar.
- Place "Charley-Bar" Hinge Bracket (B) against side of
frame with clamp up and with aluminum tubing horizontal.
Mark off tube to proper length and saw off 1/8" shorter
to allow for black plastic cap (A) to be replaced. If cut
too short, bar will be ineffective.
- Hold hinge bracket (B) to frame, making sure that hinge
bracket is centered and low enough so that the bar can be
swung up into upright storing position. (See Figure 1)
- Now drill 2 holes using 1/8" drill and secure hinge bracket
(B) to frame with #8 x1/2" sheet metal screws furnished.
(See Figure 2)
- After hinge bracket (B) is securely in place, position
black plastic socket bracket (C) so that bar will be level
when in locked position. (See Figure 3). Drill two 1/8"
holes and secure with #8 x 1/2" sheet metal screws
furnished. Be careful NOT to drill too deep, so drill bit
will not hit glass.
- When "CHARLEY BAR" is properly installed you should not
be able to move sliding panel.
Back to Top
|
 AUTOMATIC
PATIO SCREEN DOOR CLOSER Installation AUTOMATIC
PATIO SCREEN DOOR CLOSER Installation
Tools Required:
Screw Driver, Level Drill, 1/16” & 5/16” Drill Bit
- Make sure patio screen door is adjusted and operating
smoothly and clean out door track before starting installation.
- Center the closer on the outside top rail of the screen
with the hook end of the closer facing the door jamb where
the handle latches. Make sure that the closer is level.
Use a pencil to mark the hole mounting-position on the outside
of the top rail.
 Remove
the door closer and drill 1/16” pilot hole for mounting
screws. Remove
the door closer and drill 1/16” pilot hole for mounting
screws.- Reposition the door closer on the top rail with the hook
on the handle latch side. Attach the closer to the top rail
with the four (4) screws provided.
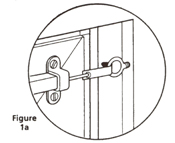
- Drill a 1/16” starter hole on the wood door jamb
stile so that it lines up with the hook on the automatic
closer, as shown in Figure 1a. Screw the eye (provided)
into the jamb and place the hook over the eye to secure.
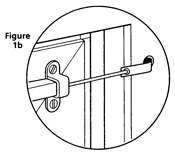
An alternate method is to drill a 5/16” hole, centered,
as shown in Figure 1b. Close the screen door and insert
the hook into the drilled hole.
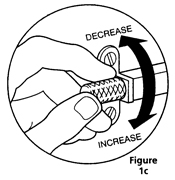
- Adjust the tension by turning the knurled pin. To lessen
the tension, turn counterclockwise and to increase the tension,
turn clockwise, as shown in Figure 1c.
|
Back to Top
|
Call for a retailer near you: 1-800-473-1803 |
|